目前分類:Cari-pasal Chef (15)

瀏覽方式: 標題列表 簡短摘要

Smokeless, oil-less clean kitchen recipe!

无烟少油干净厨房食谱!

 2014-12-21 12.53.55


Tasty crispy! 看到你就知道很香脆。

2014-12-21 13.07.33


Ingredients 材料

4 pieces drumsticks, give the thick tight a few strokes / slices using a sharp knife (4 片鸡腿, 厚肉刮几刀)

4 pieces whole chicken wings - I halved the chicken wings into wings and drummets (4 片全鸡翼,鸡翼和鸡小腿分开)

Seasoned flour 炸鸡粉

McCormick Season'n Fry Chicken Coating Mix

Seri-aji / Ajinomoto Tepung Goreng Seasoned flour (Spicy)

(I mixed both because one pack is not enough 不够炸鸡粉,所以把两种参了)

2014-12-21 13.18.12

Marinating sauce 腌料 

Onions and garlic juice - pound to obtain juice using pestle and mortar (葱头蒜米砸烂取汁)

Soy sauce (酱油)

Oyster sauce (蚝油)

Lea & Perrins Sauce  (李派林酱)

Kraft Hickory Smoke BBQ sauce (optional)

Above were the seasonings available to me, marinate for 3 hours (其实任何腌料都可,腌三小时)

2014-12-21 13.18.40

Method (方法):

1. Preheat over to 200 celcius (烘炉预热摄氏200度)

2. Cover baking tray with aluminium foil. Spray with cooking oil (烘盘铺上锡纸,抹油)

3. Dust  marinated chicken with seasoned flour. Lay on tray (鸡肉均匀上粉,铺在烘盘)

4. Spray chicken wiht cooking oil (鸡肉抹油)

5. Bake until golden brown, about 60 minutes (烤至金黄色,大约60分钟)

6. Turn chickens half way. Chicken wings only needs 40-45 minutes (中途翻转。鸡翼只需大约40-45分钟)

2014-12-21 12.10.28

2014-12-21 12.51.42


Hingsight:

1. Drumstick skin get stuck on the tray much easily than chicken wings, hence chicken wings taste much better than the thick drummets and drumsticks.

2. Baking tray must layer with aluminium foil! Look at the aftermath...

后记:

1. 其实鸡翼比较好吃,鸡腿和鸡小腿太多肉,鸡皮很容易就脱落黏在烘盘。以后只做鸡翼。

2. 烘盘一定要铺锡纸,看看后果就明白为什么。。。

2014-12-21 13.18.58      

文章標籤

大米的妈 發表在 痞客邦 留言(0) 人氣()

Pizza making needs not to be a hassle. Modified from Serious Eats, I made 2 of this incredible pizza under 30 minutes! 

Ingredients:

2 tortilla wraps 

Beef pepperoni, canned pineapples, rockets & shemeiji mushrooms 

Cheese: Mozzarella, parmerson and Parmigiono Reggiano 

Tomato puree (I used Prego spaghetti tomato sauce since I already have this at home) 

pizza ingredient  

Method:

Use a non-sticky pan the same size as the tortilla. This is to contain the melting cheese within the thin crust. 


1. Oil a non-sticky pan, heat up pan and put in tortilla.

2. At the same time, pre-heat the oven with the tray at 200c. 

3. 'Fry' tortilla with medium heat, spread tomato sauce on tortilla.

3. Sprikle cheese, arrange all ingredients and sprinkle with more cheese on top.   

4. You want to wait till the cheese melts and slightly set before transfer it to the oven tray. This way the cheese won't be runny and overflow when being baked in the oven. 

pizza 4

5. With a non-sticky pan, you can easily slide the pizza onto the hot oven tray. 

pizza 1

6. Bake till the cheese slightly brown. 

7. I used a non-sticky oven tray. When it was done I could easily slide it onto my chopping board. :) 

8. The easiest-thin-crust-pizza-in-the-world is done! 

pizza 2  

Incredibly easy, crispy and delicious. 

pizza 3  

文章標籤

大米的妈 發表在 痞客邦 留言(0) 人氣()

Serve 2 两位份

Ingredients 材料:

1. Pastry squares 馅饼皮 x 2

2. Eggs 蛋 x 2

3. Baby asparagus 嫩芦笋

4. Bason 熏肉 x 4 

5. Salt to taste 盐适量


How to make 做法: 

1. Defrost the pasrty squares & bacans, oil the baking tray. 

馅饼皮和熏肉回温。烘盘抹油。

2. Lay bacons on top of pastry squares to form a 'bowl' like circle. Bake under 200c until the pastries are slightly brown.

熏肉摆上馅饼皮成碗状。200摄氏烘至馅饼皮微黄。

3. Crack the eggs inside of the bacon bowls. Put in asparagus & sprinkled with salt. 

打蛋入熏肉碗。芦笋撒盐放入烘盘。

4. Bake under 200c until eg white is set. Voila! 

200摄氏烘至蛋白成型。


IMG_20141014_091316

IMG_20141012_112021 (1)

The pastry square I used (from Giant / Tesco) 

大米的妈 發表在 痞客邦 留言(0) 人氣()

This is the second time I made mille crepes.

The first time it looked like this, horrible!!... 

Crepes too thick (a perfect mille crepes should have layer of cream that is thinker than crepes). That's why I got this mountain-like convex cake. 

 Cream too sour (I used Martha Stweard's lemon curb recipe, not nice)

 I overwhisked the pastry cream that the batter disintegrated 

1404493_10151994924162940_1167411840_o  

Capture

Planning to make a smaller mille crepes, I modified from Chic & Gorgeous Treat recipe this time. 

Vanilla Mille Crepe

French Crepe
45g unsalted butter
375ml whole milk
85g all-purpose flour
3 eggs
50g caster sugar
1/2 vanilla extract
pinch of salt
 
Vanilla pastry cream

250ml whole milk

1/2 vanilla extract
3 egg yolks
60 caster sugar
pinch of salt
21g cornflour, sifted
25g butter
200ml whipping cream, whipped soft peak
 

 To make crepes 

1. Melt butter and add eggs into a blender and blend until emulsified. Add the flour, milk, maple syrup and salt to the blender and blend until smooth. Refrigerate overnight.

2. The next day, prepare pastry cream while waiting for the crepe batter to return to room temparature.

To make pastry cream (I refer to Chic & Gorgeous's method) 

1. Heat milk with vanilla extract with medium heat. Turn fire off right before it gets boiled.

2. Handwhisk egg yolks, sugar, salt, cornflour together. Add some hot milk to get the mixture running.

3. Return milk to stove over medium heat, pour all egg batter into milk and continue to stir till thicken. Sift the milk batter to get rid of any lumps. 

4. The recipe said set the batter aside to cool till 60 degree celcius before adding in the butter. But after I have done with the sifting, the batter already too cool, so I add in the batter immediately and whisk well.  

5. Refrigerat the thicken milk batter. While waiting for it to harden further, prepare the crepes.

 To fry the crepes 

1. The flying bit is a bit tough. I tested 3 different pans to finally settled with a 6" pan. Wasted a few pieces trying to get a thin layer. So with the above amount, I only made 15 crepes. 

2. Lightly oil the pan (I mean really light) and heat up over small heat. I only oiled the pan once every 4-5 crepes. 

3. Remove pan from heat & ladle a small amount of crepe batter into pan, swirl the batter to cover the flat surface of the pan. Remove pan from the heat just so the batter doesn't get cooked immediately, this will give you time to swirl the batter. Make sure you swirl the batter towards the side so that it doesn't get thick at the center. If you can always swirl easily to get a perfect crepe it could mean your crepe is too thick! Reduce the amount of crepe batter. You may be too clumsy to cover the pan with a thin crepe batter at first, it's ok, just drop some batter to cover any holes. 

4. Cook both sides until lighly brown. When I cooked it too brown, the thin crepes become crispy. But it's ok :p 

5. You should get a brittle and cripsy edge but it will turn soft after it is cooled or after applying pastry cream. 

To finalise vanilla pastry crem 

1. It takes about an hour to finish the crepes. Now remove the milk batter from fridge. 

2. I handwhisked the whipping cream worrying that I overwhisk this time. I achieved a soft peak but thinking that it is not done so I gave it a few more whisks, only to see the foamy cream started to disintegrate! Oh no... I failed again.

3. Never mind, I continued to fold it into the milk batter anyway. Mix well. 

4. Start to assemble! Make sure you apply a thick layer of cream evenly, cover the whole crepes except the crispy edges. 

5. When layer the crepes, press the center lightly so that it form a flat cake, not a convex cake. 


Swirl the batter towards the edge, you can see it's slighly thick at the side here

20141006_105340
 
If you cook it too brown, this thin crepe will get crispy. this is just right
 
 
20141006_105414
20141006_105345
 
You should get a flat surface (not convex) when you lay all the crepes on top of each other
 
20141006_112820
 
 
Cover whole surface wiht vanilla pastry cream except the crispy edges.
 
 
20141006_120358
 
I creamed the top layer lightly and spinkled with almond slides :)
See I got a perfect flat cake this time! Voila!
 
 
 20141006_123429  

 IMG_20141006_215322  

大米的妈 發表在 痞客邦 留言(0) 人氣()

早餐最烦的是什么?

不知道煮什么,除了蛋还是蛋。。。

这两款烘蛋早餐还可以秀一下。

Don't know what to cook for breakfast? Other than egg, it is still egg. 

Here are 2 types of baked eggs, good for showoff! 

Hashbrown ham baked egg 马铃薯火腿烘蛋

Hashbrown火腿烘蛋

1。把烘盘抹上牛油。放入解冻了的hashbrown,顺着烘盘边缘按平。中间按薄一点。Buter baking bowl, lay thrawed hasbrown in baking bowl, pressed towards side. Keep a shallow base at the center. 

2。铺上火腿片,成浅碗装。Lay turkey ham at the centre, form a shallow bowl. 

3。打个蛋在火腿上。放入烘炉150摄氏烘到蛋白成型。Crack an egg. Baked at 150 celcius until egg white is set. 

4。撒上葱花,胡椒粉。吃!Sprinkle with spring onion, pepper and eat! 

2012-10-14 08.28.46


餡餅皮五花菜蛋 Multi-veggies pastry egg 

2014-09-16 09.45.35  

1。把烘盘抹上牛油,铺上餡餅皮。Butter baking bowl, lay thrawed pastry in the bowl. 

2。铺上培根。冰箱有什么菜就放什么菜吧。我刚好有樱桃番茄,白菇。Top with bacon, and any veggies that you may have in the fridge. I used cherry tomatoes and mushrooms. 

3。打个蛋,顺便撒些盐。放入烘炉150摄氏烘到蛋白成型。Crack an egg, sprinkle with salt. Baked at 150 celcius till egg white set. 

吃!EAT! 

文章標籤

大米的妈 發表在 痞客邦 留言(0) 人氣()

I planned to make oreo cheesecake on Sunday for my little tot. But at the last minute, I decided to divide the batter into two parts, rushed to the store to buy mangoes and made frozen mango cheesecake for myself, inspired by Purple Monkey

Capture  


Cheesecake batter recipe modified from Dimcookguide (by the way, his non-narrative recipe videos are great!), but I guess any non-bake cheesecake recipes will do. 

This is not a very sweet version, especially after frozing, so you may want to add more sugar.  


Ingredients for 5-inch pan: 

9 pieces oreo 

30g unsalted butter 

250g Original Philadelphia cream cheese 

200ml whipping cream 

60g sugar 

10g powdered gelatin 

2 mangos (sweet ripe mango is critical but do not use mango that is too ripe as it will be hard to handle 


1. Remove mango skin, slice it lengthwise into thin pieces. Make sure you slice it slightly thin so that it can be curled easily. But if the mango is too ripe it will break. Cut the remaining into chunks.

2014-09-14 14.14.00   

2. Follow your recipe to prepare the cheesecake batter. When it is ready, mix the mango chunks in the batter. Pour in the pan half full. 

3. Freeze for an hour or until semi hardened. 

2014-09-14 15.14.51    

4. Cut the mango pieces into half (lenthwise), so that it has a curvy side and a straight side (like half moon). Lay the mango on top of the frozen cheese cake, straight side down, outside in. If your mango is too ripe, it will be too soft to stand. You can try to cut mango in a way that the straight side is slighly thicker than the curvy side. Slowly form a nice rosey appearance. You can fill the gaps with small pieces. 

2014-09-14 15.27.49

5.  Freeze for a night and it is ready! Remember to remove from freezer to refridgerator section, thraw a little before cutting. Otherwise you'll need to use a saw! 


2014-09-16 11.27.13

2014-09-16 11.22.53  

 How about a mini one for the tot? Using a cupcake cup instead. I think it is lovely! 

2014-09-14 15.40.38  

By the way, this is my little tot's favourite oreo cheesecake in a cupcake cup. 

2014-09-16 11.29.36  

文章標籤

大米的妈 發表在 痞客邦 留言(0) 人氣()

P1040607IMG_0528IMG_0754  

These are lazy lunches I made for Damien in different occasions.

They are the same... just buttered toast breads sandwiched with either ham or sausages, cheese and salad, secured with with animals picks bought from Daiso. Damien loves the steamed sweet corns with diced carrots, tossed with butter and seasoned with salt. In some occasion, I added in adamame to add vitamins that can only be found in green vegies. :)

大米的妈 發表在 痞客邦 留言(2) 人氣()

IMG_0332I prepared 3 sets of this bento when I went visiting an ex-colleague. She has 2 kids about the age of my 2 year-old then. I thot kids would love colourful bento.  While Damien happily whacked the whole thing, her kids hardly finished it.
It's a kid version of sushi, idea learned from Happylittlebento.com. Bacially remove the crust and press a piece of bread flat, roll in ham, sausage, cheese or fried egg. Then cut it into 3 & pinched each with a pick. I added some carrot shred in some of them, so it does look like a sushi isn't? :)

Same old steamed sweet corns and carrots - Damien's favourite. Also a steamed sausage that was cut into 8 tentacles at one end, it's an octopus!

大米的妈 發表在 痞客邦 留言(0) 人氣()

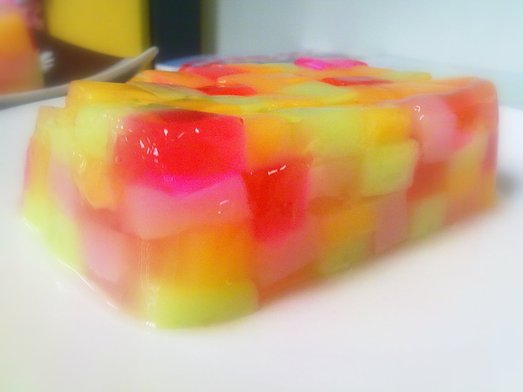
Jelly2.jpg

This appetizing jelly is made of konnyaku & agar-agar.

First of all, what's the different between agar-agar & konnyaku jelly?

Agar-agar is the soft type, which can come in powder or string-like format. When done, it has a softer and taufu fa-like soft tecture. Normally we call it 菜燕 。Konnyaku is the harder type, apparently it's from Japan. In Chinese, the packet said 蒟蒻。 It has a bouncy and elastic tecture. Because of its hard texture, I recommend to use solely konnyaku for this recipe. 

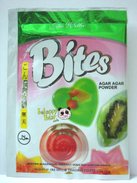
I used Bites brand for both, it's made in Singapore. You can find it at RM1.90 at Tesco.

Agar-agar.jpg
Ingredients:

Konnyaku powder (clear) - 2 packets 10g each

Cultured milk - different colours (like Vitagen, Nutrigen etc.)

Nata-de-coco

Sugar - as instructed behind the packers

Water - as instructed behind the packets


Recipe:

1. I used 1.5 packets for all different colours, and reserved another 0.5 packet for final set. 

2. Cook the 1.5 packets first as instructed behind the packet.

Read the packet instructions carefully. Apparently there are different sequence when you use jelly vs. konnyaku podwer. Importantly, pour the powder GRADUALLY & SPARINGLY so that clumps won't form.


3. When done, pour jelly water into different square / rectagle containers about 0.5 an inch high, add coloured cultured milk into different containers. 

4. Set it aside to harden. 

5. When done, cut konnyaku into square cube, 0.5x 0.5 inch, like the size of nata-de-coco.

6. Arrange different colours of konnyaku cube with nata-de-coco in a separate square / rectagle containers.

7. Cook the remaining 0.5 packet, without any added colour. Pour into the nicely arranged konnyaku containers until fully covered.

8. You will notive bubbles forming in between cubes. Use a chopstick to slightly stir / move the cubes so that the clear layer covers & sips in between cubes to hold them firmly when harden.

9. Let it set in the fridge. 

10. Voila! 

Cultured milk instead of colourings was used for 2 good reasons:

*I thot it is healthier than plain colouring (i know it's not true).

* It adds different flavours to my jelly.

Enjoy!

大米的妈 發表在 痞客邦 留言(0) 人氣()

sambla petai.jpg

OL is not good in cooking, definitely, but I'm progressing. Today I learned to cook sambal petai from my mother-in-law.

Look at this photo... I'm sure you are drooling. It's easy to cook Sambal Petai, Mrs. Lim's Nyoya style, as how my mother-in-law cooks it. Read on.

Ingredients:

Dried chilies - 10 (washed & drained. Add more if you prefer a hotter flavour)

Turmeric - 2 pieces (skinned & washed; it's for colouring, can do without as it doesn't change the taste)

Shallots - 10 (medium size; skinned, washed & cut into small pieces for blending)

Belacan - 1 piece (2 inch x 2 inch x 1/2inch)

Petai - 1 full plate (peeled from a bundle of 5)

Prawns - amount up to individual (washed & deveined)

大米的妈 發表在 痞客邦 留言(0) 人氣()

damien eat.jpg 大米一岁8个月大。他爱自己吃饭。

我最喜欢煮“饭”给大米吃,因为他每次都吃得津津有味,也不会嫌不好吃。

本来我都不放盐不放油,大米岁半后就觉得盐也是身体需要的矿物质,放一点没关系。

大米吃的粥都是用电子砂煲煲的,懒妈妈我煲的粥吃午晚两餐。一餐一个肉、两三个菜。以下是我自创的美味营养餐,煮法和粥底
都是一样的,只是根据不同的材料先后次序不同。所以我也不必一一例明,就是选一个肉,看看冰箱有什么菜,就地取材!

粥底

要煮好水米融成一体的滑粥,要先把米浸水过夜。这样米心吸饱了水,煮起来很容易就开米。如果米心是干的,米的表层煮烂了,米心还不烂,粥就成一粒粒。但是米的新久,品质也有关系。如果不浸水有耐心的煮它4-5个钟,米也一样烂成糊的。

浸过夜的米放适量热水,入砂煲大火煲滚,转小火(放热水省时间,粥很快就滚了)。

肉底

鱼、猪、鸡、虾、干贝都可。

大米的妈 發表在 痞客邦 留言(0) 人氣()

今天国庆日,在家跟家婆学煮rendang kambing。家公是娘惹的后代,家婆煮得一手好菜,尤其是 nyoya 菜。后天她去中国张家界旅行,整个礼拜我们没饭吃了,所以她特别煮了备一家四五口吃上好几天的分量。哈!

和家婆学煮菜唯一的困难是材料的分量都是用“大概”(agak-agak)的,问她也说不上来,她说都是用经验来煮的,怎样量吖?所以以下有很多“大概”的分量说明。可是很多煮菜的秘诀都是食谱没有列明的,这些就要跟做饭做了六十年的老人家学啦!

rendang.jpg

A料:

南姜 - 我家婆说一个手掌大的分量 (那块姜看起来是很大的,如果3寸长大概10块)

葱头 - 20粒(去皮)

辣椒干- 40g (浸水洗净)

       黄姜 - 3寸长的4块

香茅头 - 2 粒 (茎待用)

大米的妈 發表在 痞客邦 留言(0) 人氣()

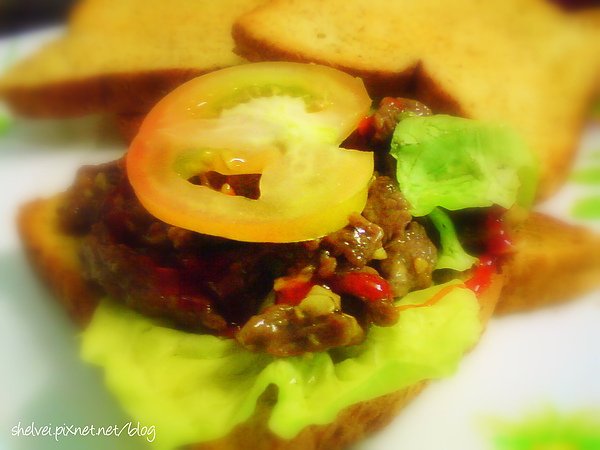
I came about this idea after trying beef sandwich at Wondermilk - you know, the shop that sells cupcakes.

They serve some nice sandwiches but rather expensive for the 2 slices of breads.

Here is what I have modified from theirs, and it turned out to be my hubby's favourite lunch:

Garlic Beef Sandwich

DSC00540.JPG 

Ingredient:

150g Beef (enough for 5 sandwiches / 10 slices of bread).

- Slice beef to thin pieces & marinate with soy sauce. Never marinate with salt (well, something to do with osmosis, the beef will get very dry). 

- Add a spoonfull of corn flour, mix with fingers. Leave for 1/2 hour or so. Why corn flour... not very sure, I learned from my mother, something to do with the tenderness of meat during stir frying. Old wisdom. Just follow.

Garlic & ginger - chopped.

Wholemeal breads (10 slices)

- Spread with generous amount of butter, toast till golden brown (I have tried white bread, but it is not as nice as wholemeal bread)

Salad leaves and tomatoes (sliced)

 Preparation: DSC00543.JPG

1. Heat some oil, saute garlic & ginger.

2. Add in beef. Stir fry for 2 - 3 minutes (depending how well you want it to be done). Add a bit of water if it is too dry. No need other seasoning.

3. Ok... you don't need me to teach you how to sandwich the breads. But I'd always recommend Lingam Chilies sauce. Made in Malaysia!

 :-)

Enjoy your OL lunch.

大米的妈 發表在 痞客邦 留言(0) 人氣()

It's a hot Sunday.  I did 3 rounds of laundring, then bathing, feeding & putting Damien to sleep. Going out is not an alternative.

"What for lunch?" hubby asked. "Let's see what's there left in the fridge". I don't normally do marketing, my mother-in-law does. So I got to be creative with limited ingredients.

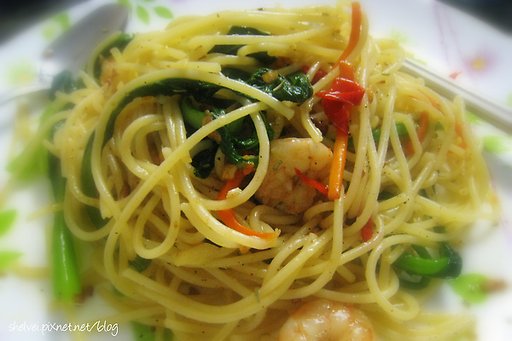
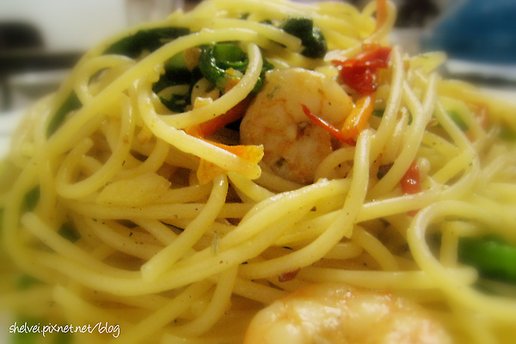
Here's what I have "invented" - Choy Sem Aglio Olio Spaghetti.

IMG_0645.JPGIngredients:

1 big red chili - sliced

4 small chili padi - chopped

Garlic - 1 whole garlic, chopped

Choy sem - washed & drained IMG_0635.JPG

1/2 Carrot - sliced to strips (this was the remaining from cooking Damien's porridge)

Prawns - marinated with salt

Olive oil, pepper, chicken stock granules, salt & MSG for seasoning (I know it's not healthy... but it has to be as far as taste is concerned)

Rosemary (supposed to put chopped Parsley leaves, but I don't have any, so I tried Rosemary that I used to marinated lamb shoulder yesterday. It turned out to be really aromatic!)

Spaghetti enough for 2. Hold speghetti in fist to the size of a 20 cents (that's enough for one person).

Preparation:

1. Boil spaghetti in rapidly boiling water until tender (break spaghetti to check if the centre is white in colour. Cooked spaghetti has no white centre).

2. When cooked, drained spaghetti. Toss with some olive oil to prevent it sticks together.

3. Boil water in a deep pan. Put in choy sem to boil for 3 minutes.

4. At the same time, heat wok with generous amount of olive oil over medium fire. Saute garlic & chilies together.

5. Turn fire to max, put in prawns, spaghetti & choy sem in order. Sprinkle with some Rosemary.   

6. Put seasoning to taste & fry for 2 - 3 minutes.

Voila!

 IMG_0646.JPG

IMG_0649.JPG

A satisfying lunch must served with something premium...

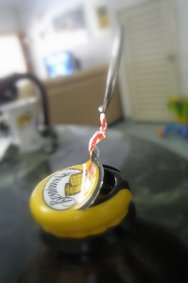
The best Root Beer in the world - RM3.99 from Cold Storage (notice the clever cap)? 

Ahhhh... blurrrp... what a cooling Sunday.

IMG_0650.JPGIMG_0651-1.JPG

大米的妈 發表在 痞客邦 留言(0) 人氣()

I was a nerd in school & now a busy OL. Cooking is a foreign skill but I manage to pick up some simple recipes from my mother-in-law.

Lamb shoulder is one of the simplest but delicious one. That's what I had just cooked for lunch.

Simple ingredients for 2:

  • Lamb shoulder            4 pieces
  • Salt & rosemary          For marinating

 Rub both sides of lamb shoulders with salt, tenderise with tenderer.

Marinate1.JPGHammer2.JPG

Rub a generous amount of rosemary on the meats & leave for at least an hour. You can find bottled rosemary at hypermarkets & Jusco.

Heat wok & fry some garlic to add to the aroma (if you like). Use medium fire to fry meats to cook.

Marinate.JPG Rosemary.JPGFry.JPG

Ta-ta-ta-ta...

Served with salad, steamed carrots & potatoes + Lingam Chili sauce (无得弹!)

Done.JPG 

大米的妈 發表在 痞客邦 留言(0) 人氣()